How to record a music show at home with Audacity
(This guide is also available as a PDF.)
With the current restrictions on studio access in Australia (and around the world), many community radio presenters are looking to pre-record their shows without the facilities available at the station studio for automated scheduling. It is possible to make a presentable program of music interspersed with talk using equipment you probably have at home already.
What do I need?
- A computer with audio editor Audacity installed and at least 10 GB of free space. Audacity is a free open-source audio editing program. It’s not particularly easy to use, and it occasionally misfires, but it’s widely used and comes with a very useful range of plugins.
- An external DVD/CD drive if your computer does not have a functioning one installed and you wish to use material from CDs.
- A mobile phone or digital recorder (such as a Zoom).
Preparation
Make a list of all the music items to be included and identify where voice segments are to appear. Total duration is difficult to calculate, as the voice segments will vary in length, depending on presenter preference. For the programs I have prepared, total music length was 85% of the time slot duration. Small adjustments to program length can be made in Audacity if required.
Recording a music/talk show
Audacity is used to record each segment of music as a separate project. The recording is done by setting Audacity to record all sounds made by the computer, using the Speakers (Loopback) option for input as shown below for Windows. All the examples in this article are taken from Windows 10. Audacity should look similar on a Mac, but the CD-playing software will differ.
It’s best to close all other programs except Audacity and disconnect from the internet to make sure no audio notifications appear.
Then plug in your external CD drive (if you’re using one) and insert a CD. If the external CD drive is not detected by Windows, try restarting. The CD should then start playing at track 1 using the default audio player (Media Player for Windows computers). Move the cursor to the bottom of the screen, and the control bar should appear.

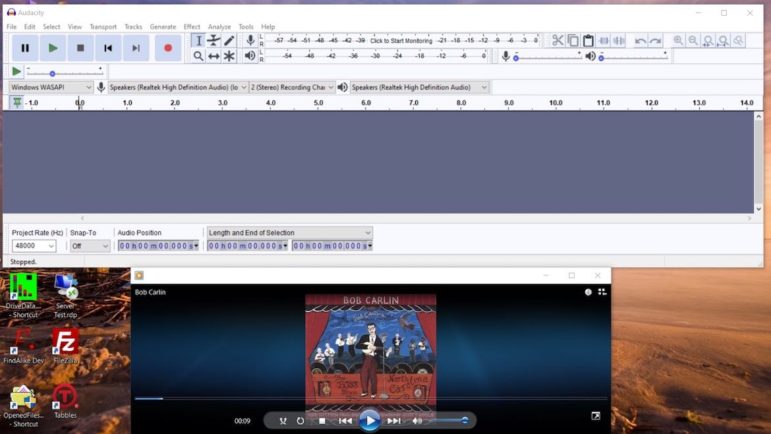
Click the Pause button in the center, and the Media Player window should be similar to that shown below.
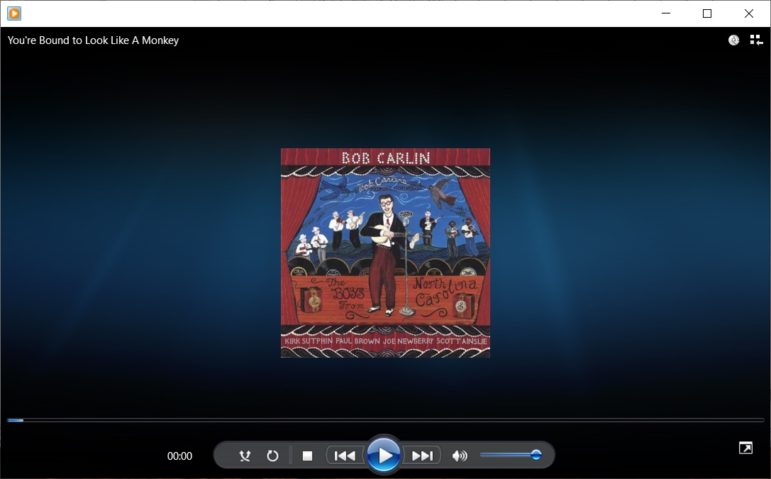
With the player paused (showing the white triangle in the center button), scroll forward (or back) to the track you want. Then resize the Audacity and Media Player windows so that both are visible:
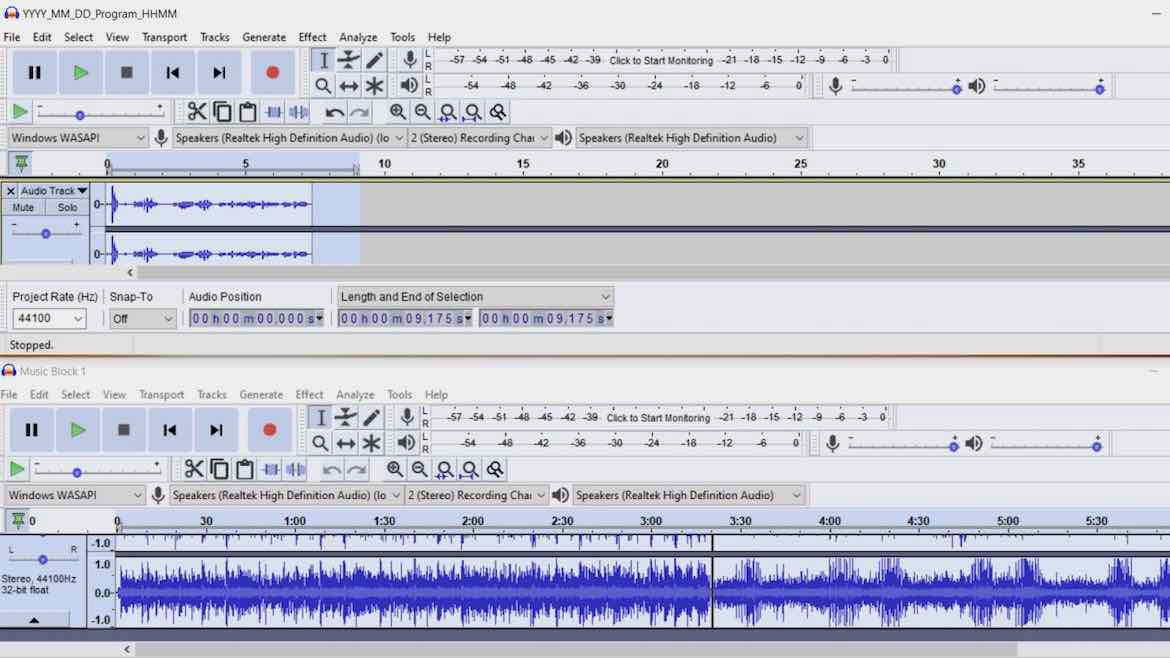
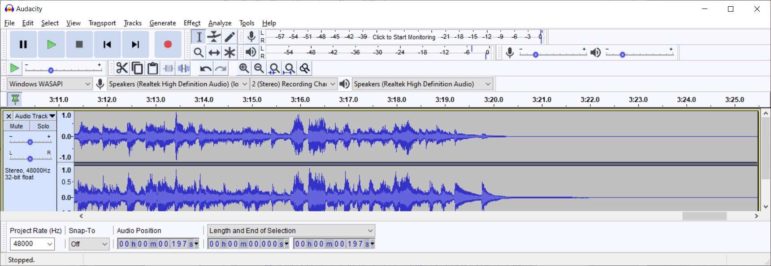
Now click the red record button in Audacity (6th button from the left). Audacity will pause until output is received. Click the center button in Media Player, and once the track starts playing, Audacity will start recording to show a display similar to that shown below:
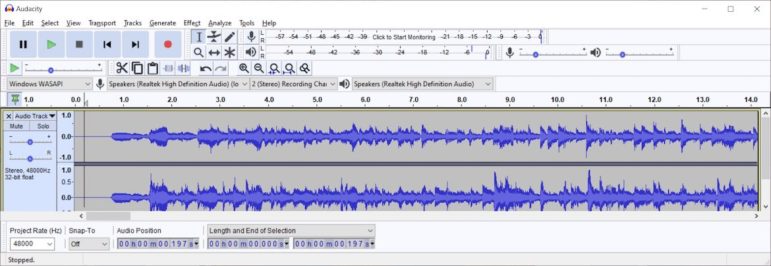
The width of the blue band indicates the volume of the recording. The record level control shown here has no effect for loopback recording.
Sometimes recording fails during the track playback — if this happens, the blue waveform band contracts to a line and Audacity notes it as a dropout.

If this happens, repeat the recording process. If it happens repeatedly, you may wish to load the track by ripping the CD.
Once the track has finished, click the center button in the Media Player control panel to pause playback and click the black square Stop button in Audacity (3rd from the left).
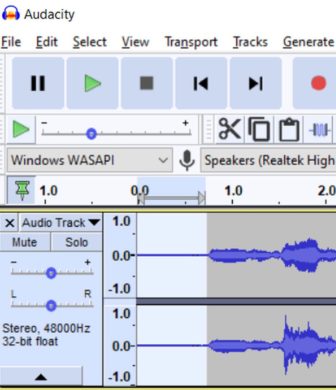
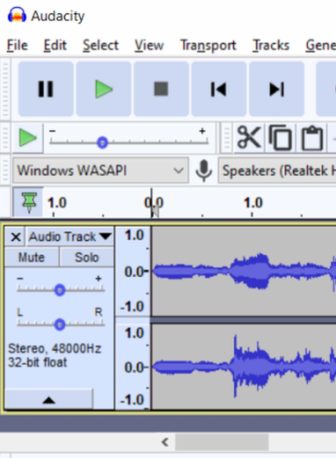
The recording should now be trimmed. Drag the scrollbar below the waveform to the left and select the region to remove by clicking and dragging in the waveform to give the display as shown below left. Clicking the Delete button removes the selected content as shown below:
Repeat the trimming process for the end of the track. Any editing action can be undone with Ctrl-Z (Cmd-Z on a Mac). If another track is to follow immediately, ensure that Media Player is ready to play it by repeating the load process described earlier. Then move the Audacity cursor to the end of the recorded and trimmed track and click Record. A red cursor now appears.
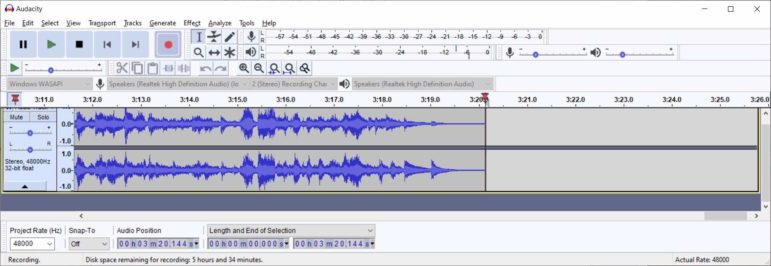
Once the CD track starts playing, the waveform moves past the cursor, lagging somewhat. Once it has finished, stop Media Player, stop Audacity and trim the end as required. The gap between the tracks can be reduced by scrolling the waveform to the join and selecting a region for deletion.
The block of music can then be saved as an Audacity project. The name should a sequence number for the music block.
Loading tracks via CD ripping
To load tracks into Audacity rather than record them, the “Switch to Library” button at the top right of the Media Player window should be clicked to give a display similar to that shown below:

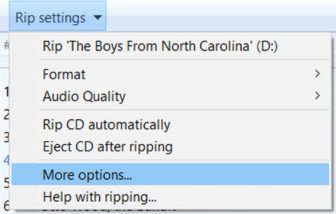
Uncheck the box to the left of the Title to deselect all the tracks and select the tracks you want to rip. Then select More Options from Rip Settings:
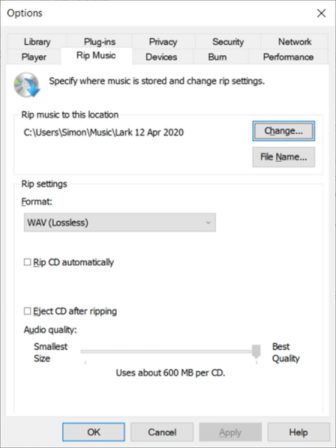
Select a folder to contain the ripped files and choose a lossless format (such as WAV). Then click Rip CD, and the tracks will be copied to files below the selected folder.
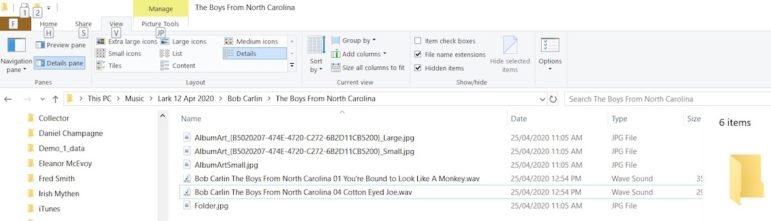
Now start Audacity and select File -> Import Audio. Choose the “Read Files Directly” option. Repeat for as many tracks as required for the music block. Additional tracks will appear separately in the Audacity display as shown below.
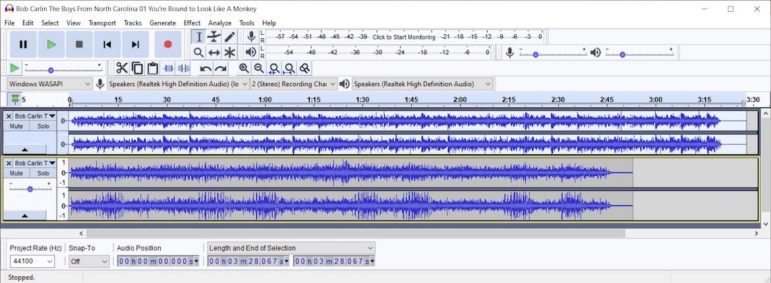
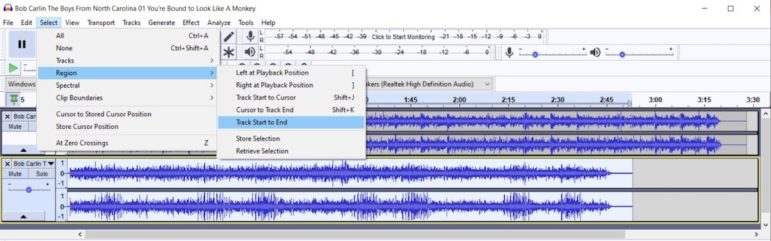
To append the second track to the first, click in the second track (whose background will change to white) and click Select -> Region -> Track Start to End.
Then select Edit -> Copy (or Ctrl-C (Cmd-C on a Mac)), click at the end of the first track and select Edit -> Paste (or Ctrl-V/Cmd-V), and the second track will be appended:
Now delete the second track by clicking the X at the top left corner of the track, trim the start, join and end as required and save as an Audacity project, with a name including the sequence number of the music block.
Adding voice
Voice segments may be program and track intros and outros. They should be recorded separately and spliced in using Audacity.
Audio-recording functionality on computers is often lacking, even if it is operational. Most laptops have built-in microphones and recording apps (Voice Recorder for Windows) for use with communications apps such as Skype, but they often have high levels of background noise from computer fans and disk drives.
Headsets with microphones can reduce this problem, but the very close microphone position may give an unnatural timbre to recordings, although it is not noticeable for phone-like communication. The close proximity of the microphone to the speaker’s mouth means that most of what it picks up is direct sound rather than sound reflected from room surfaces. This means that headsets will perform acceptably in acoustically live environments.
Recording direct to the computer removes the need to transfer files between the recording device and the computer. The Audacity input should be changed to Microphone (either internal or external) to use this option, but sound quality does not appear to be as good as that obtained from a phone sound recorder.
Radio studios generally have very good audio quality from expensive microphones and dead acoustics, even if sound isolation is sometime lacking and the sound of doors closing or loud conversation occasionally intrudes. This is difficult to achieve at home. The deadest room of a house (or flat) is generally a bedroom, but this may not be where the computer is, unless it’s a portable laptop or tablet. Heavily furnished living rooms will also be fairly dead, but a minimal-style room with few soft surfaces will tend to be live.
Smartphones generally come with built-in sound recorders (Voice Memos on iPhones) and, being portable, can be used in acoustically dead environments. Android phones may not have a built-in sound recorder, but there are plenty of 3rd-party sound recorder apps available for all phone types. Recordings have good sound quality but are generally in mono.
iPhones record in m4a format, which can be imported directly into Audacity. 3rd-party applications usually have a selection of formats available. Recordings can be transferred from the phone to computer via email or file sharing. Voice segments will appear as a separate track in Audacity, which can be spliced in as described in the CD Ripping section. Mono tracks are duplicated when copied and pasted into a stereo track.
Another option is to use a digital recorder (such as Zoom). These will record in stereo with high sound quality. Transfer of the files to the computer can be done via a USB connection or by transferring the SD card from the card to the computer.
If voice segments are all recorded together, the file names should indicate the music blocks which they precede or follow.
Splicing and exporting
To create the program project, open the Audacity project containing the first voice segment comprising the program intro and the introduction to the first music segment and save it with the project name required for pre-recording (for example YYYY_MM_DD_Program Name_HHMM). If required, convert the mono voice track to stereo by selecting Tracks -> Add New -> Stereo Track and copying the mono track, pasting it into the new stereo track and deleting the mono track. Then open the first music block project from this project. This will appear as a separate Audacity instance as shown below:

Now select the entire music block track (using Select -> Region -> Track Start to End), copy it, paste it after the intro and trim any excessive pauses if desired. Music and voice segment levels can be adjusted via the Audacity Effects -> Amplify plug-in. The default is to amplify a selected region to give a peak level of 0 db. CD tracks may have different levels, and adjustment of these may be necessary. Don’t forget to save the project after each paste operation in case Audacity hangs or the computer stops working.
Creating crossfades
The process described creates butt joins between segments. If cross-fading is desired — i.e., a voice segment playing while a music segment is starting or finishing — this can be achieved by using separate tracks for music and voice segments and aligning each as desired. This certainly gives a smoother program but involves positioning segments much more carefully if they are in the body of the program. Intros and outros commonly incorporate crossfades (perhaps with a program theme tune), and it may be desirable to create these as separate blocks before splicing them in. Starting and ending your program with instrumental music makes for smoother scheduling, as these can be faded less obtrusively.
After you have created and spliced in all the blocks, save the YYYY_MM_DD_Program Name_HHMM project, close the music block project, open the next Voice segment and repeat the alternation of music blocks and voice segments until the end of the show.
Time adjustment, leveling and exporting
Once the program is complete, its duration can be seen in Audacity. It is then possible to adjust using the Effect -> Change Speed option, which allows the desired duration to be set. Changes of less than 5% are not noticeable. It’s also possible to make the program level (a process known as compression) with another Audacity Effect to achieve a consistent level. This will make the program sound like AM radio, which routinely compresses broadcast signals. The Audacity project can then be exported in any format acceptable to the station via the Export menu item. FLAC format is a lossless format that is generally acceptable, but MP3 formats give smaller files at the price of some loss of quality. However, program files created using a high bit rate (> 192 kbps) are difficult to distinguish from those using lossless formats.
Transfer to the station
Program files are generally too big to transfer via email, but there are now many ways of transferring large files via cloud storage. Dropbox is a commonly used platform. A free account gives a storage capacity of 2 GB, which is more than enough for most programs. A 2-hour program takes about 700 MB in FLAC format. Stations may use a range of software for scheduling pre-recorded programs, but they all accept most common audio file formats.
Simon Kravis has been involved in community radio in Australia since the days of tape splicing (the late 1970s) and has been one of the presenters of Sunday-morning folk music show Lark In the Morning on 2XX in Canberra since 1982. The show has a Facebook page, too.


Hi i am Dj-Ray at wvud 91.3fm. my 2 hours show are done at the studio but d station is closed due to this Virus. My show consisting of 1min of intro,then 4min of music.Then 4min of music when music is finish, i talk about who d artist is and so and so. Music again and this will continue like that with promos and infos for the first hour. The second hour is the News, sports, weather, for about 15 minutes.Then d next 3/4 hour is similar as the first but with a 45 sec outro.
How can i record this type of show on Audacity or Virtual dj using a laptop and or Numark controller and email it to the radio station. Can you guide me through correspondents or booklet. It look very difficult since i have not much clues of the softwares. Thank you.
Appreciatively,
Raynau Holassie.
The article describes how do it as clearly as I can. 2 hour programs are far too large to email – 2XX uses Dropbox to transfer large files and the Scheduling co-ordinator then adds the program to the playout software (Station Playlist). One of the problems of home pre-records is that news, weather, promos and info easily available in the studio are not easily accessible. The Station needs to place all of this material in an Internet accessible place so it can be included in the pre-record if items can’t be scheduled individually. If news, weather, promos etc are all scheduled as separate items then pre-record blocks can be added in but this places big demands on the scheduling co-ordinator. They would much rather schedule a 2 hour block with all the items already present at the correct times. The Station needs to set up things for remote pre-records – if that can’t be done then pre-records aren’t an option.